Once you have linked your PCT Agcloud account with Operations Center™ and set the correct permissions, you can import fields from or upload fields to Operations Center™ as well as link existing fields between the two systems. Watch the video or see the steps below to learn all three processes.
TABLE OF CONTENTS
Click HERE for more info on integrating your Agcloud account with Operations Center™.
-Note: Field boundaries will not be automatically updated in either system. If an edit has been made in either system, the processes listed below must be used to update the boundary in either Agcloud or Operations Center™.
Once a Field has been uploaded, imported, or linked, a John Deere logo will be displayed next to the Field name, denoting that it is linked to Operations Center™.
-Note: An active field link is required to send layers and prescriptions from Agcloud to Operations Center™.

Import
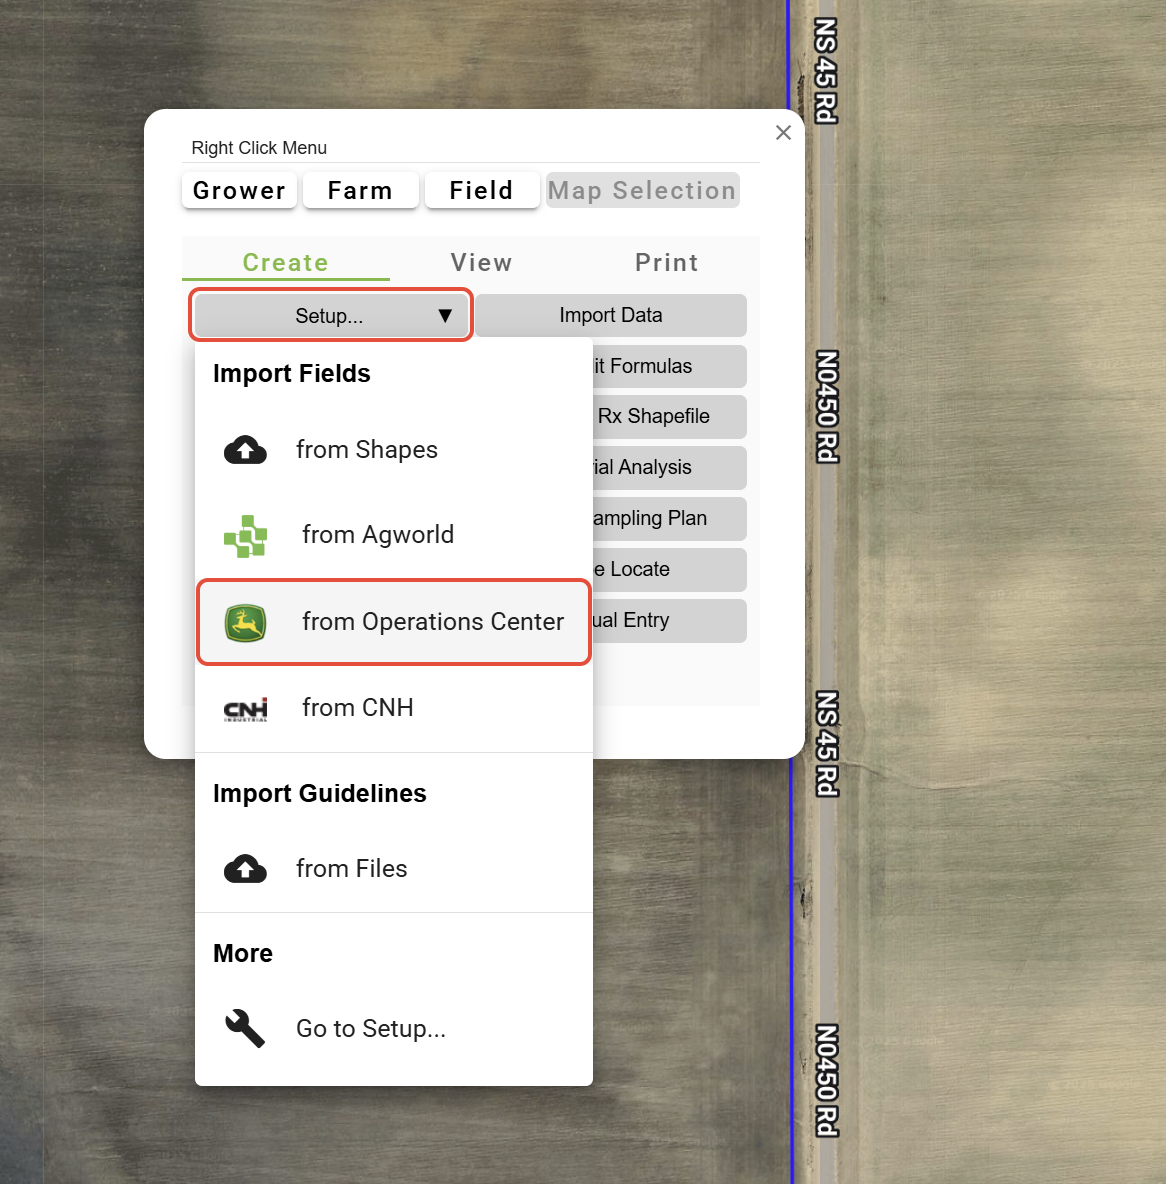
1. In View, click the 'Setup' dropdown in the Right Click Menu and select 'from Operations Center™'.
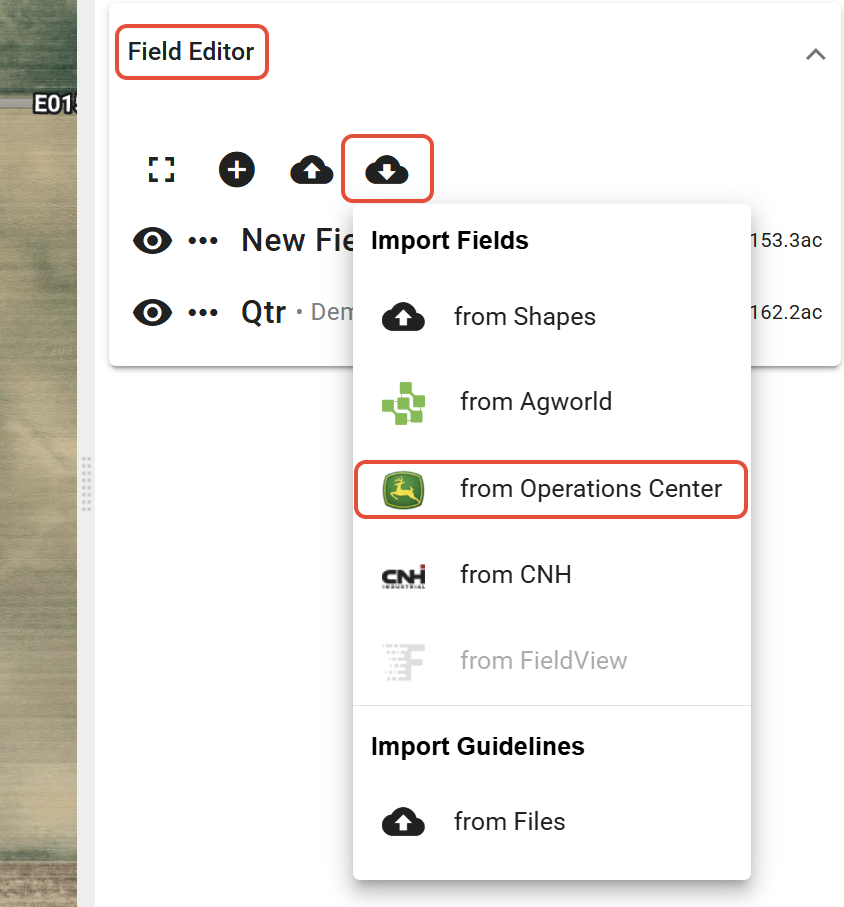
Or, in the Setup tool, select the 'Field Editor' dropdown, click the 'Import fields' button, and click 'from Operations Center™'.
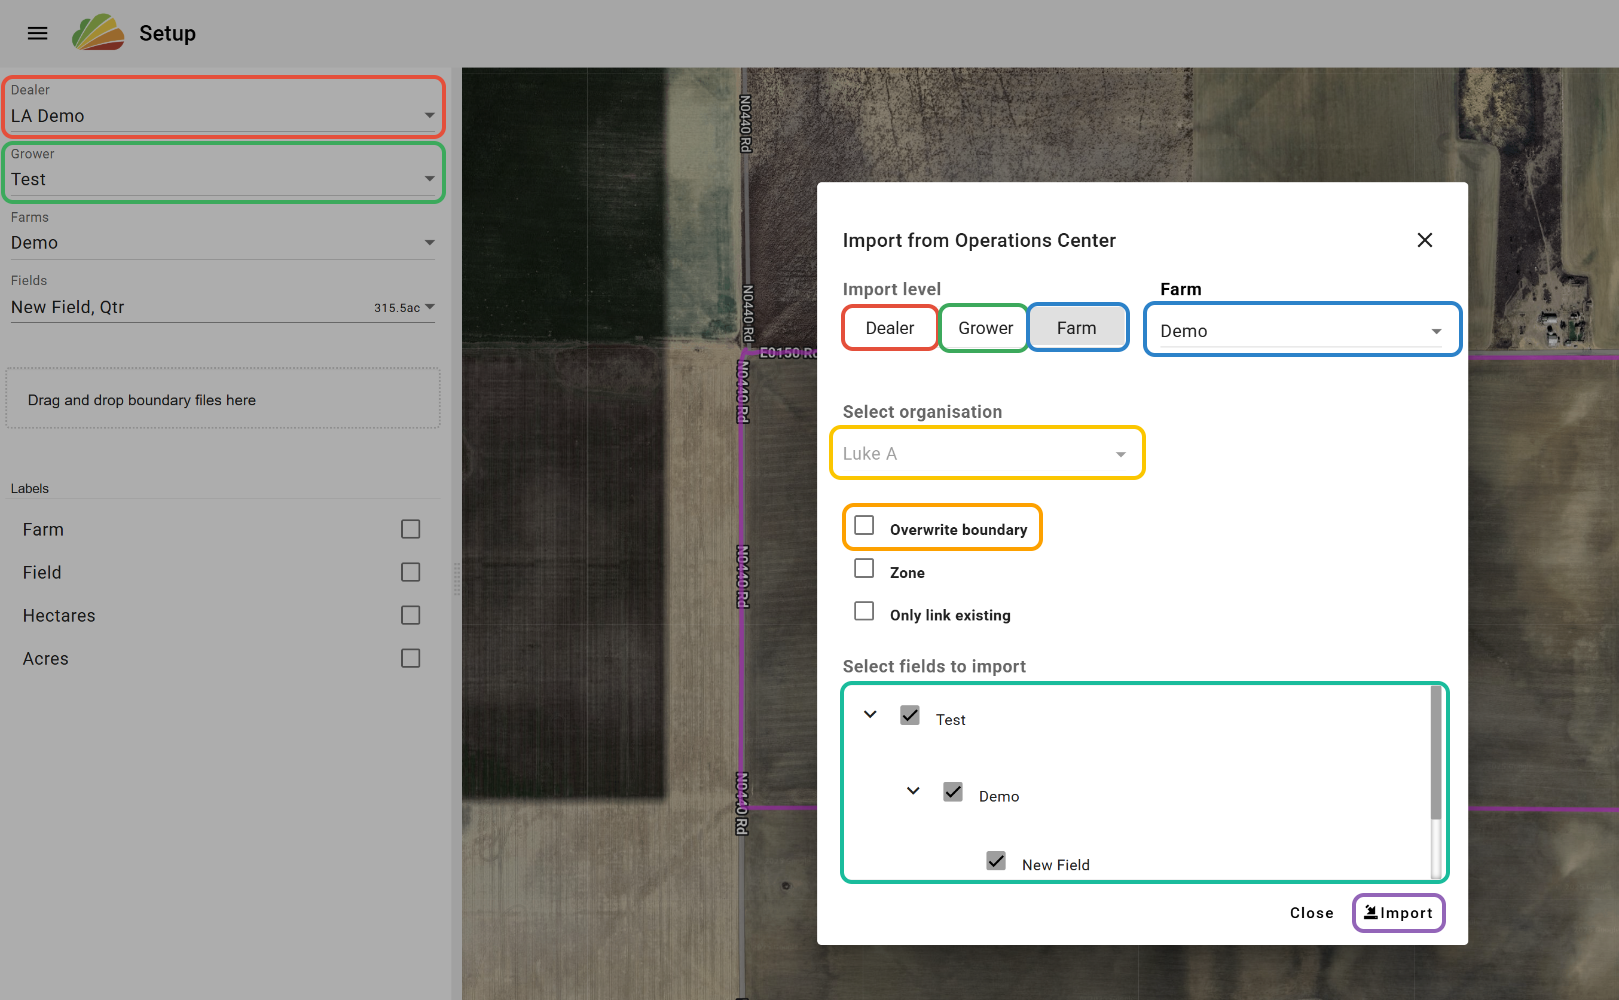
2. Select the Import Level.
- 'Dealer' will create a new Grower under the selected Dealer based on the selected Client from Operations Center™, and import the selected Farms and Fields to that Grower. (Select this option to bring over all information from Operations Center™)
- 'Grower' will import the selected Farms and Fields from Operations Center™ to the Grower selected in the DGFF tree in Agcloud.
- 'Farm' will import the selected Fields from Operations Center™ to the Farm selected in the "Farm" dropdown. The options available in the dropdown are dependent on the Grower selected in the DGFF tree.
3. Select the Operations Center™ Organization.
'Overwrite Boundary' - If an equivalent field already exists in Agcloud, it will be overwritten with the Operations Center™ boundary. Not overwriting will link the fields but not change any boundaries.
4. Select the Clients, Farms, and Fields to import from Operations Center™.
5. Click 'Import'.
Link
There are two options available for linking existing fields in Agcloud to fields in Operations Center™: in bulk (automatic) and field-by-field (manual). If the Field names (and Grower and Farm names, depending on the selected Import Level) match exactly between the two systems, the Fields can be linked automatically all at once. If the names do not match, there is a field-by-field process that lets you manually establish the links and update the field names if you so choose. Both options are detailed below.
In Bulk
1. In View, click the 'Setup' dropdown in the Right Click Menu and select 'from Operations Center™'.

Or, in the Setup tool, select the 'Field Editor' dropdown, click the 'Import fields' button, and click 'from Operations Center™'.

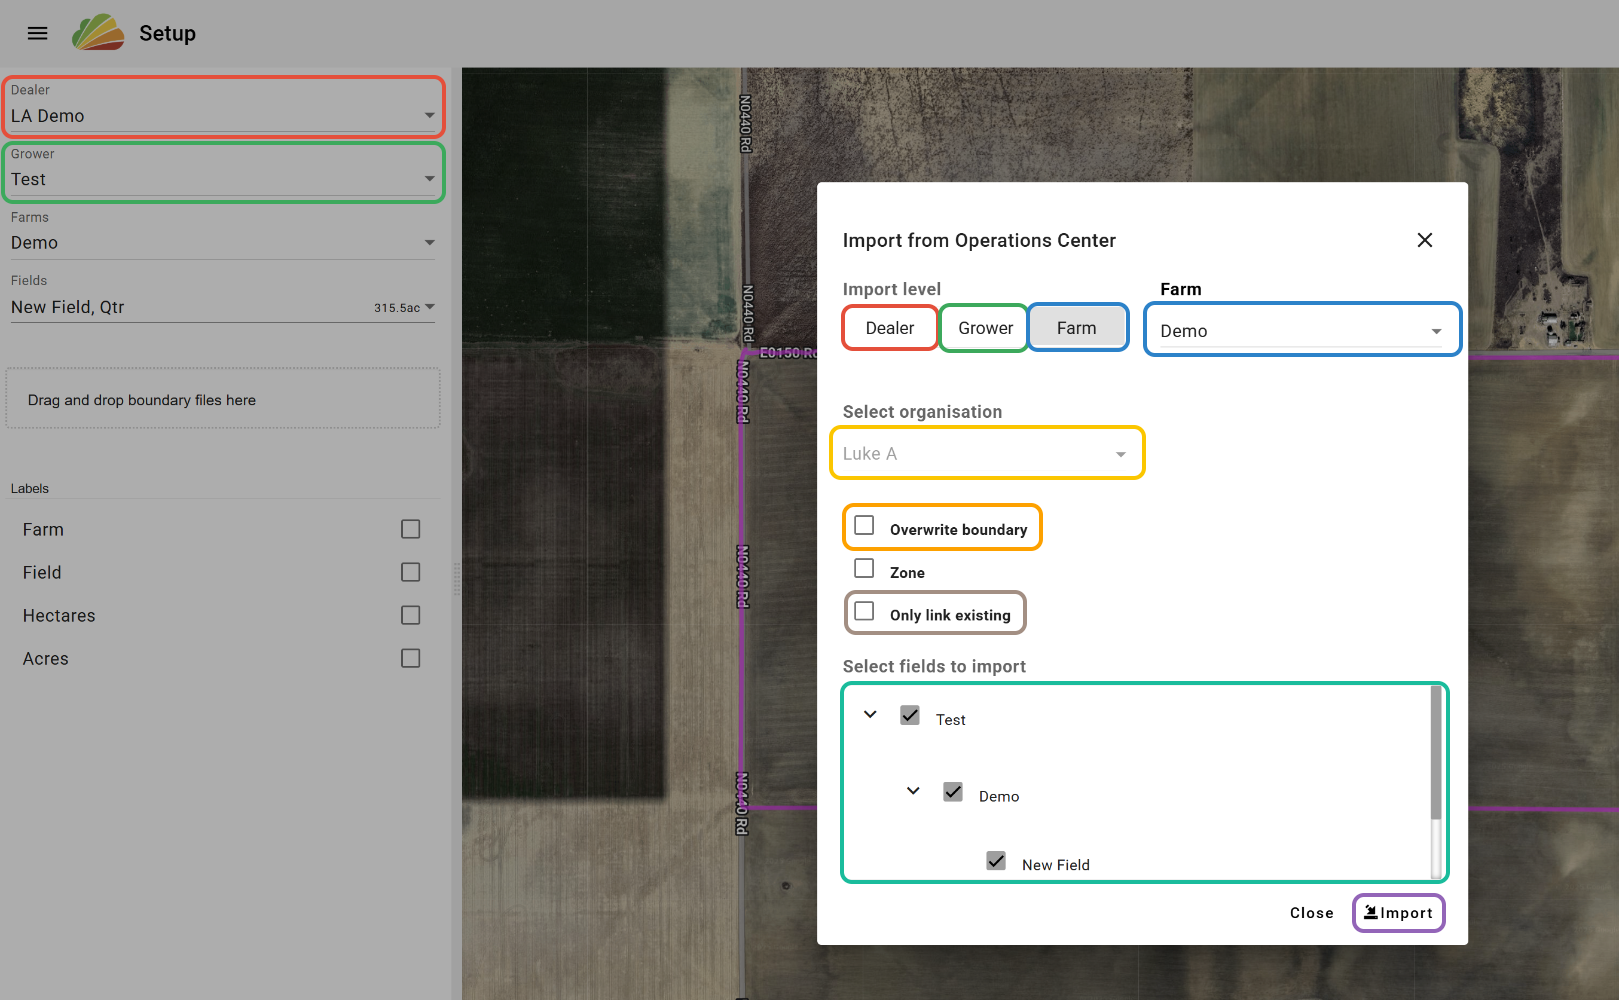
2. Select the Import Level.
- 'Dealer' will link all selected Growers, Farms, and Fields with matching names.
- 'Grower' will link the selected Farms and Fields from Operations Center™ under the Grower selected in the DGFF tree.
- 'Farm' will link the selected Fields from Operations Center™ under the Farm selected in the "Farm" dropdown. The options available in the dropdown are dependent on the Grower selected in the DGFF tree.
3. Select the Operations Center™ Organization.
'Overwrite Boundary' - When checked, if an equivalent Field already exists in Agcloud, it will be overwritten with the Operations Center™ boundary. If unselected, the Fields will be linked, but the boundaries will not change.
'Only link existing' - It is recommended to have this checked when linking. When checked, any Fields from Operations Center™ that match Field names (and Grower names and Farm names, depending on the Import Level) will be linked with the equivalent fields in Agcloud. Any Fields that do not match will not be imported. In other words, new fields will not be created if this option is selected. This can be used as a check to see if the names match exactly in both systems.
4. Select the Clients, Farms, and Fields to link from Operations Center™.
5. Click 'Import'.
Field-By-Field
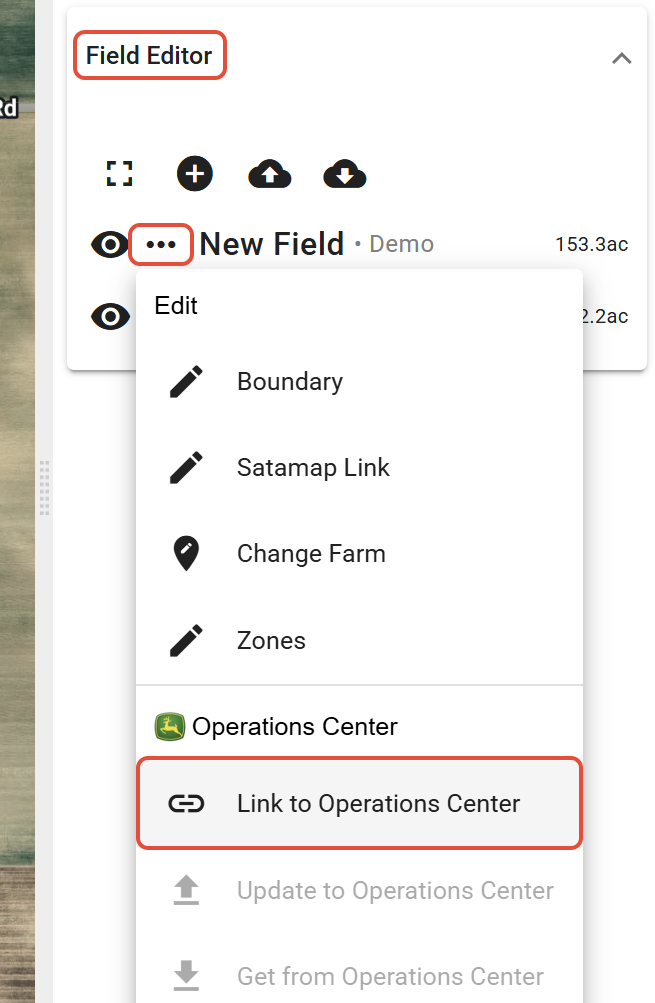
1. In the Setup tool, open the 'Field Editor' dropdown, click the '...' button next to the Field, and select 'Link to Operations Center™'.
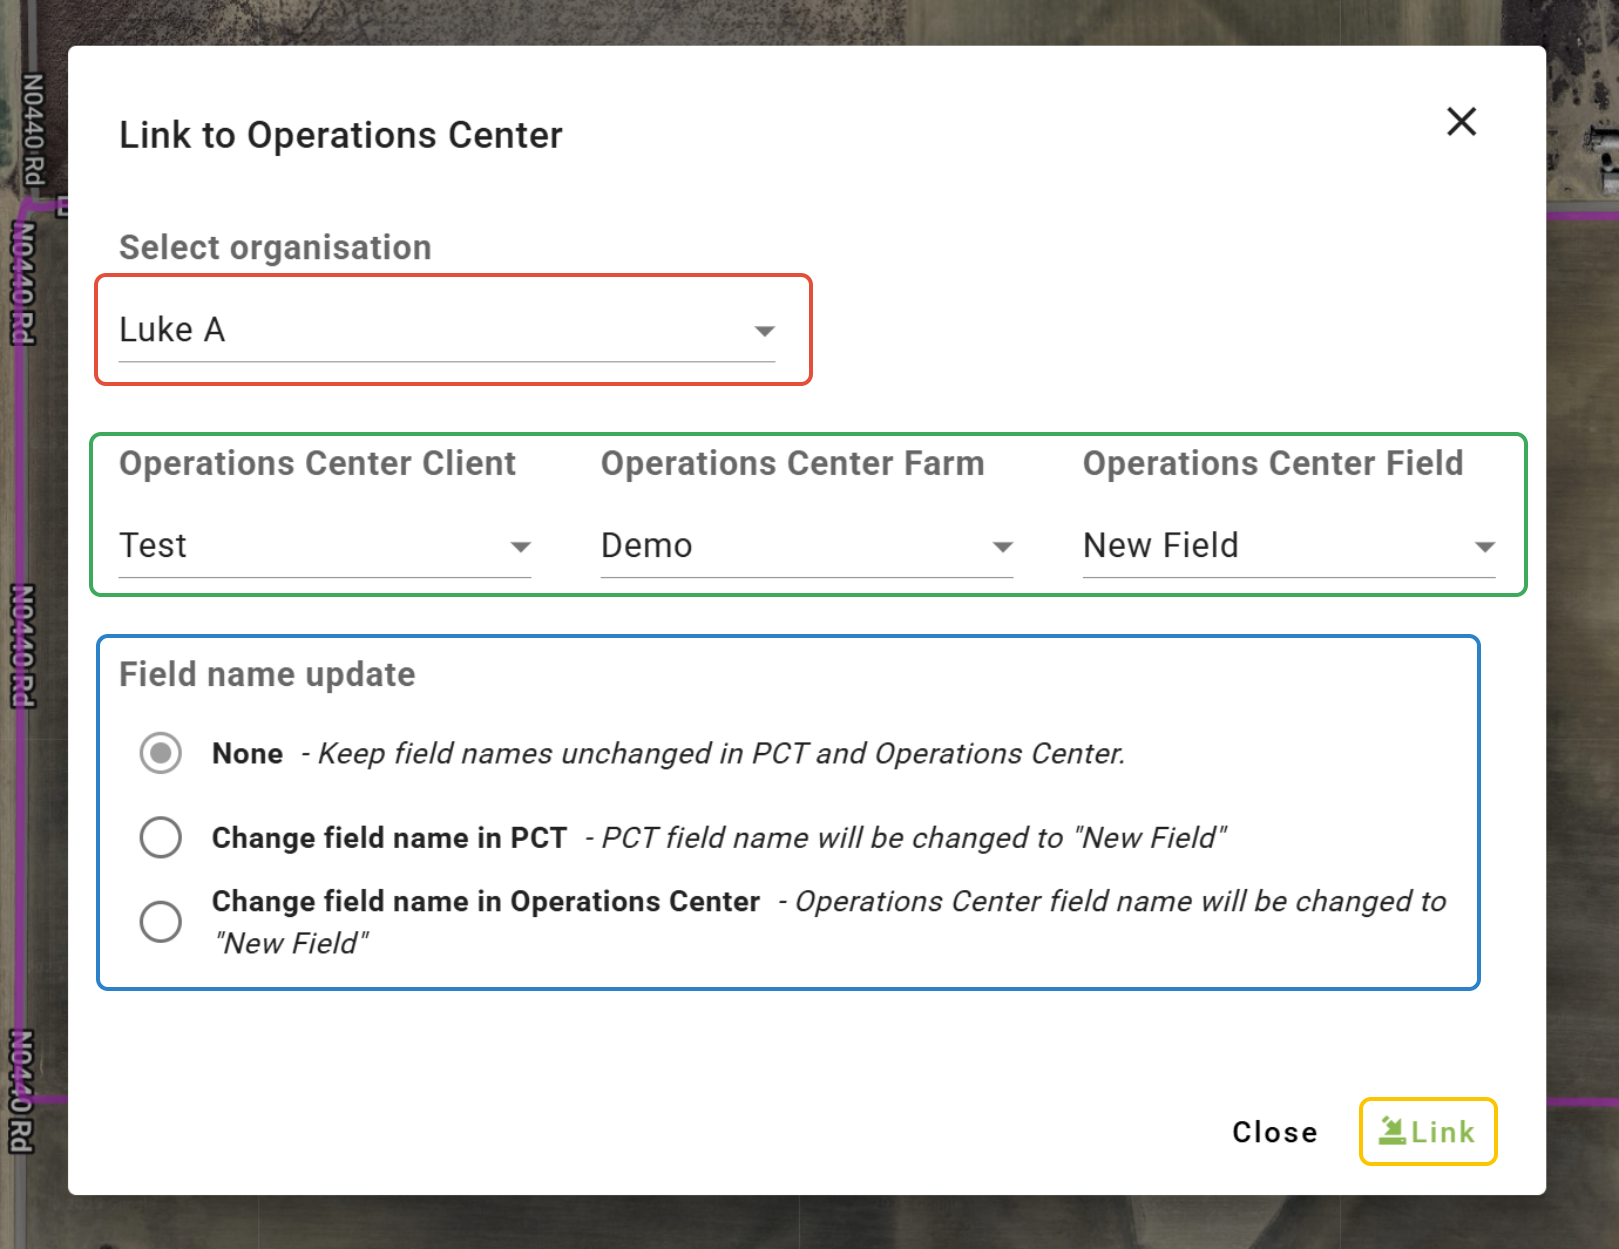
2. Select the Operations Center™ Organization.
3. Choose the Operations Center™ Client, Farm, and Field that the Field in Agcloud is to be linked to.
4. Choose to either keep the Field names in both systems unchanged, update the Field name in Agcloud with the Field name in Operations Center™, or update the Field name in Operations Center™ with the Field name in Agcloud.
5. Click 'Link'.
Upload
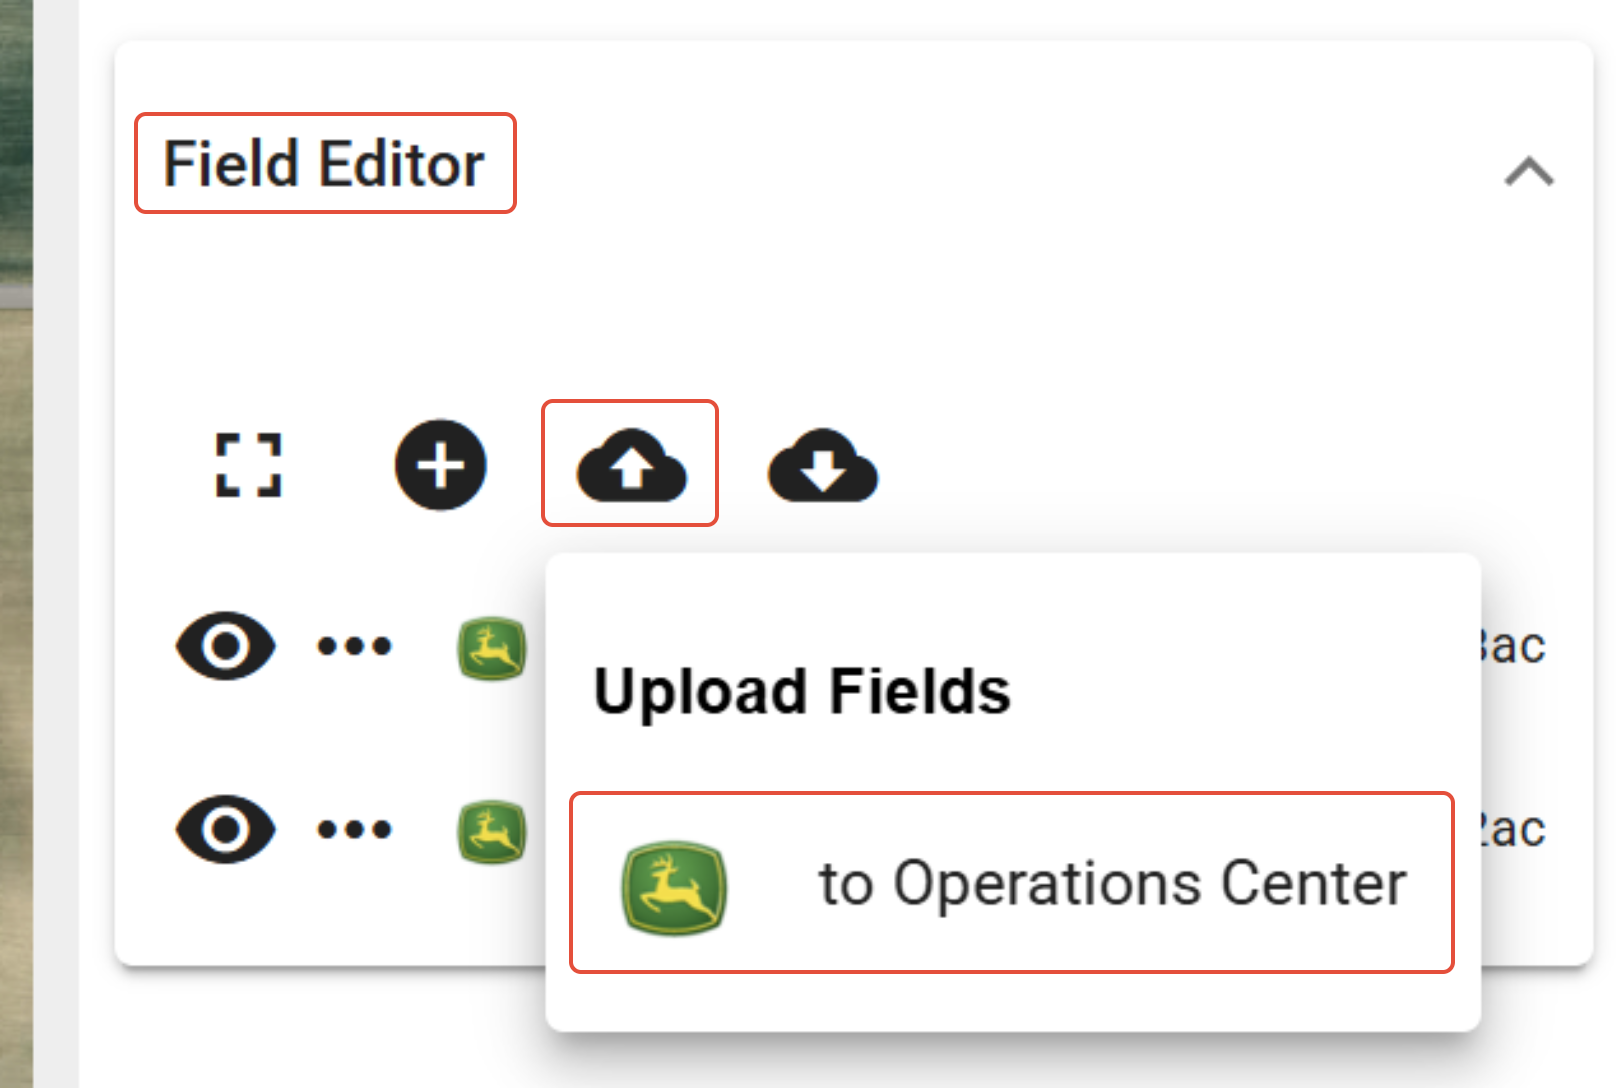
1. In the Setup tool, select the 'Field Editor' dropdown, click the 'Upload Fields' button, and select 'to Operations Center™'.
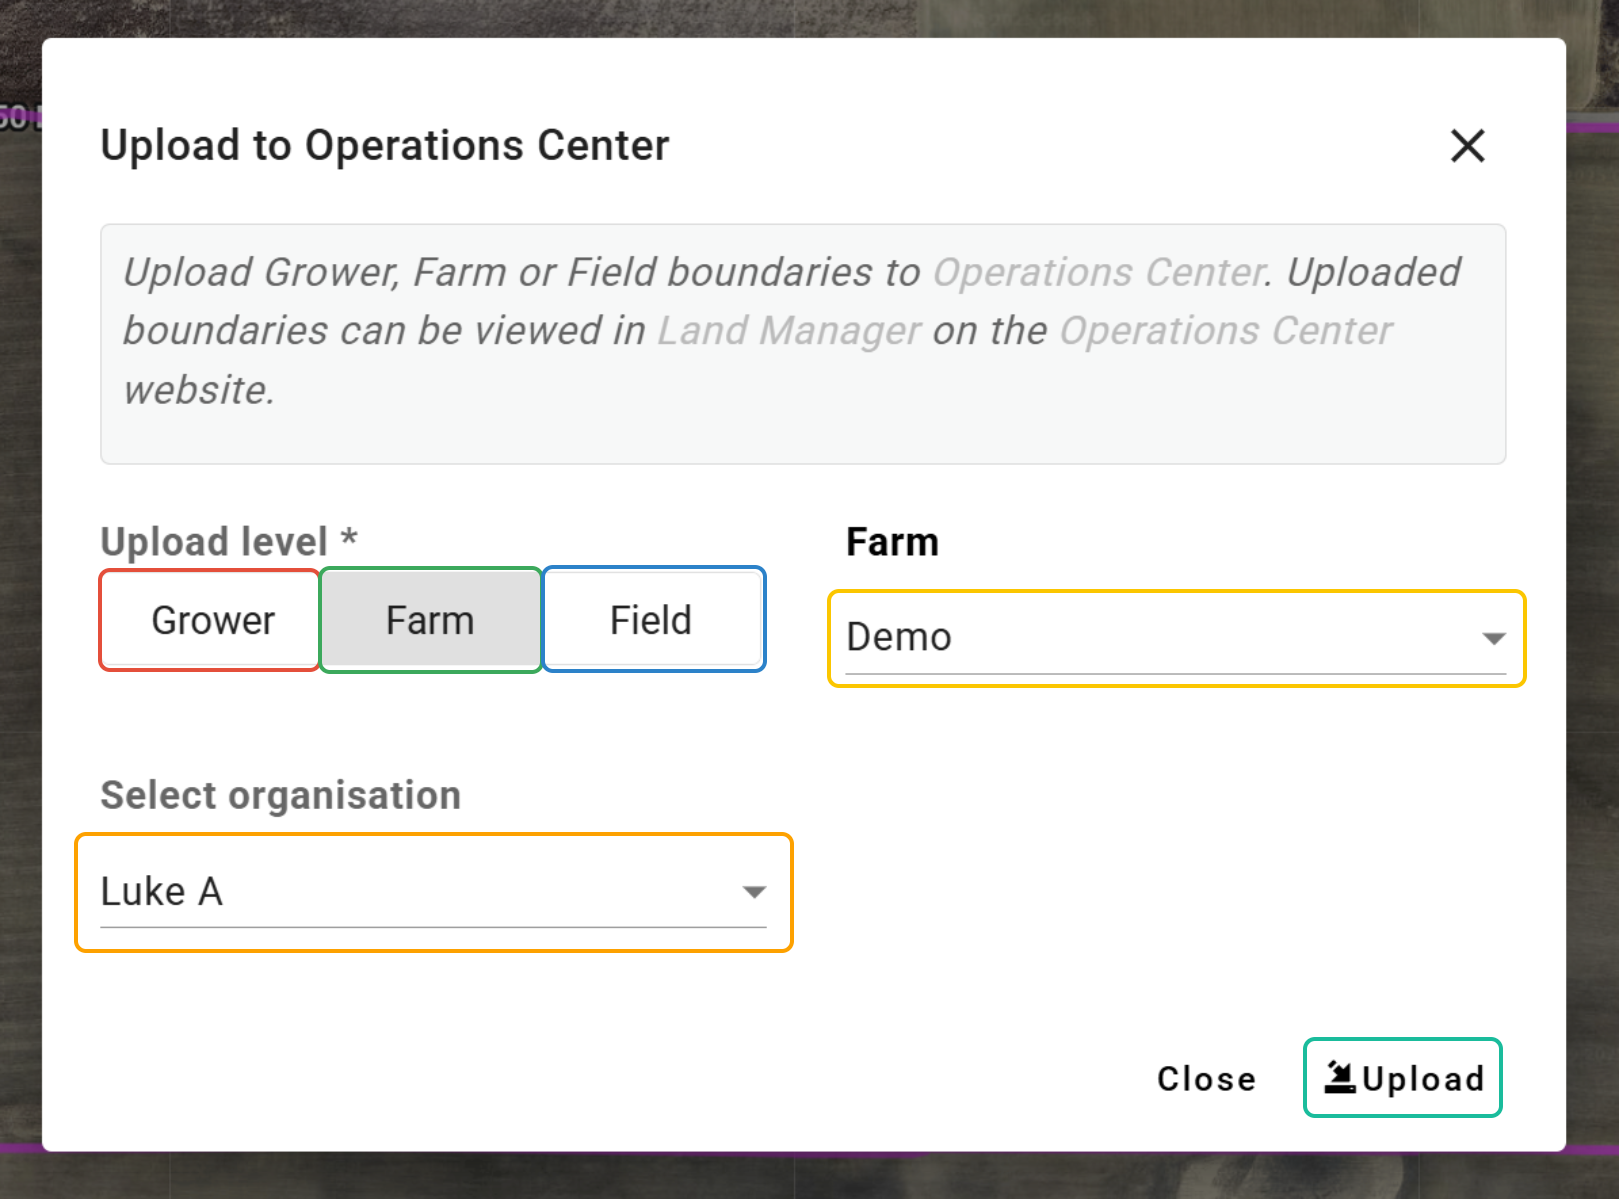
3. Select the Level at which you want to upload.
- 'Grower' will upload all field boundaries for the selected Grower.
- 'Farm' will upload all field boundaries for the selected Farm.
- 'Field' will upload the field boundary for the selected Field.
4. Select the Grower, Farm, or Field to upload.
5. Choose the Operations Center™ Organisation to send the boundaries to.
6. Click 'Upload'.
Was this article helpful?
That’s Great!
Thank you for your feedback
Sorry! We couldn't be helpful
Thank you for your feedback
Feedback sent
We appreciate your effort and will try to fix the article