Single Product Rx can be used to create single-product prescriptions for multiple fields at a time. The 'Single Product Rx' button in the Right-Click Menu in View and the 'Single Product/Multi Field' tab in the Rx tool are the same application in different locations. Follow the steps in the video or article below to learn how to use this tool.
TABLE OF CONTENTS
- How to access the Single Product Rx tool
- Select layers
- Choose Product
- Layer for Intersection
- Classify Settings
- Assign Rates
- Save and Export
- Edit
How to access the Single Product Rx tool
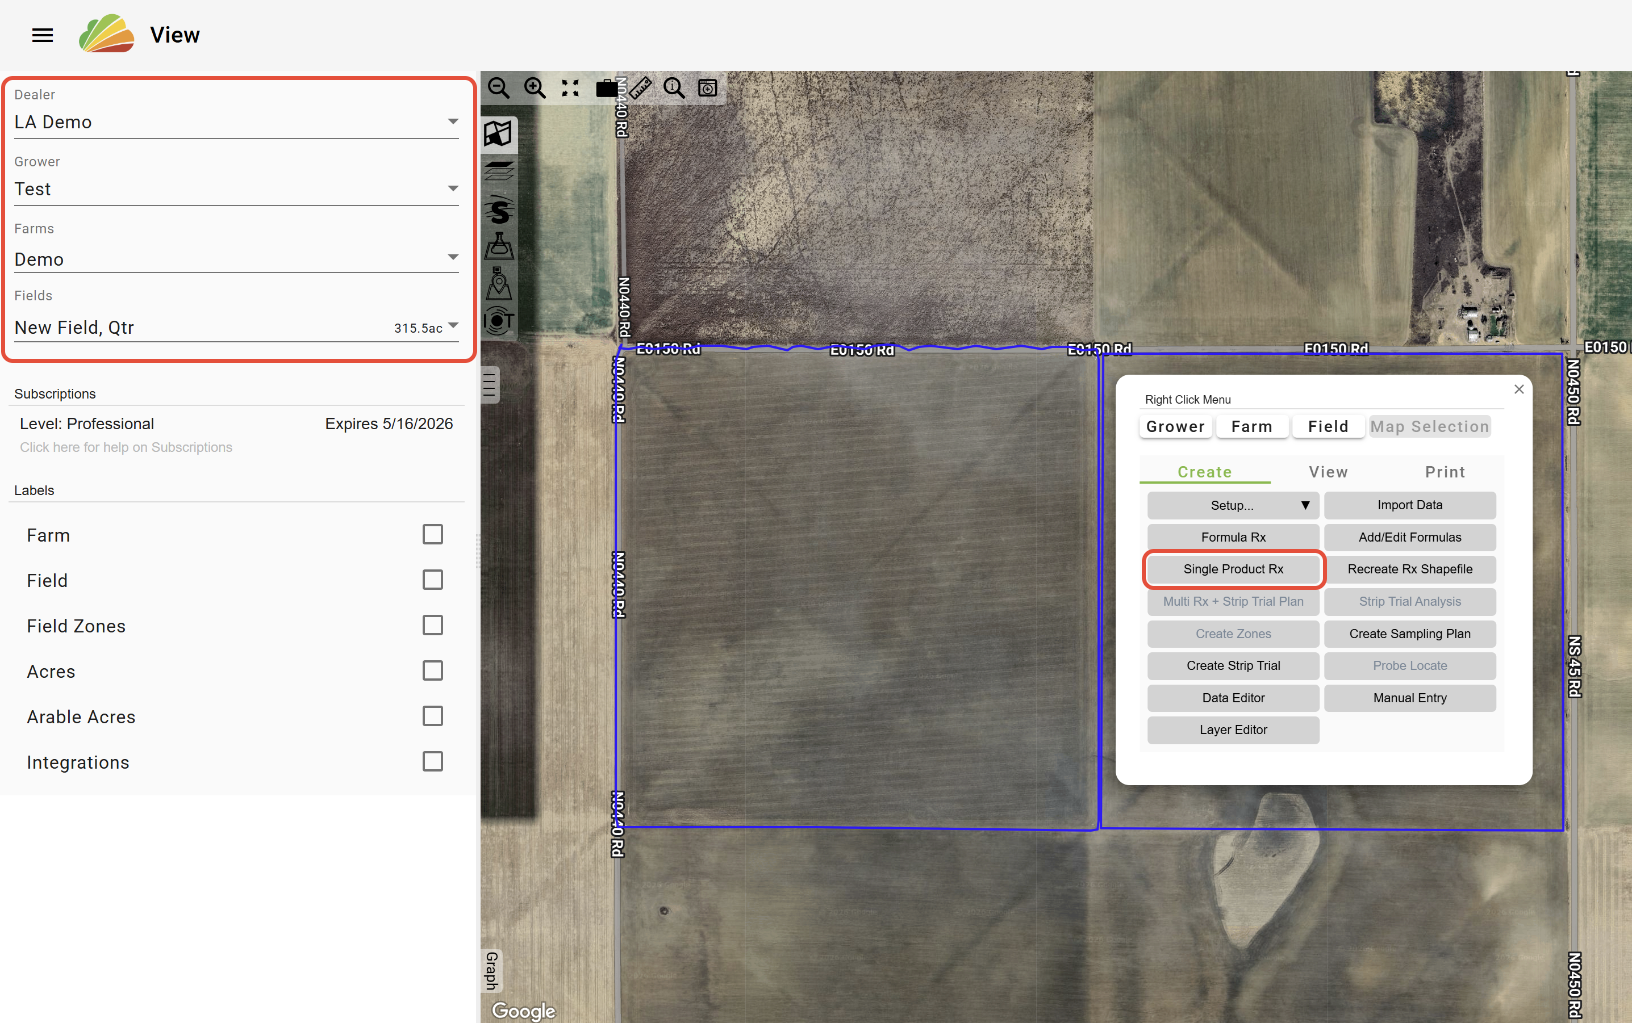
Right Click Menu (View)
-This option allows for the most flexibility when selecting fields and layers.
-In the View tool, with the desired Grower, Farm(s), and/or Field(s) selected, click the 'Single Product Rx' button in the Right-Click Menu.
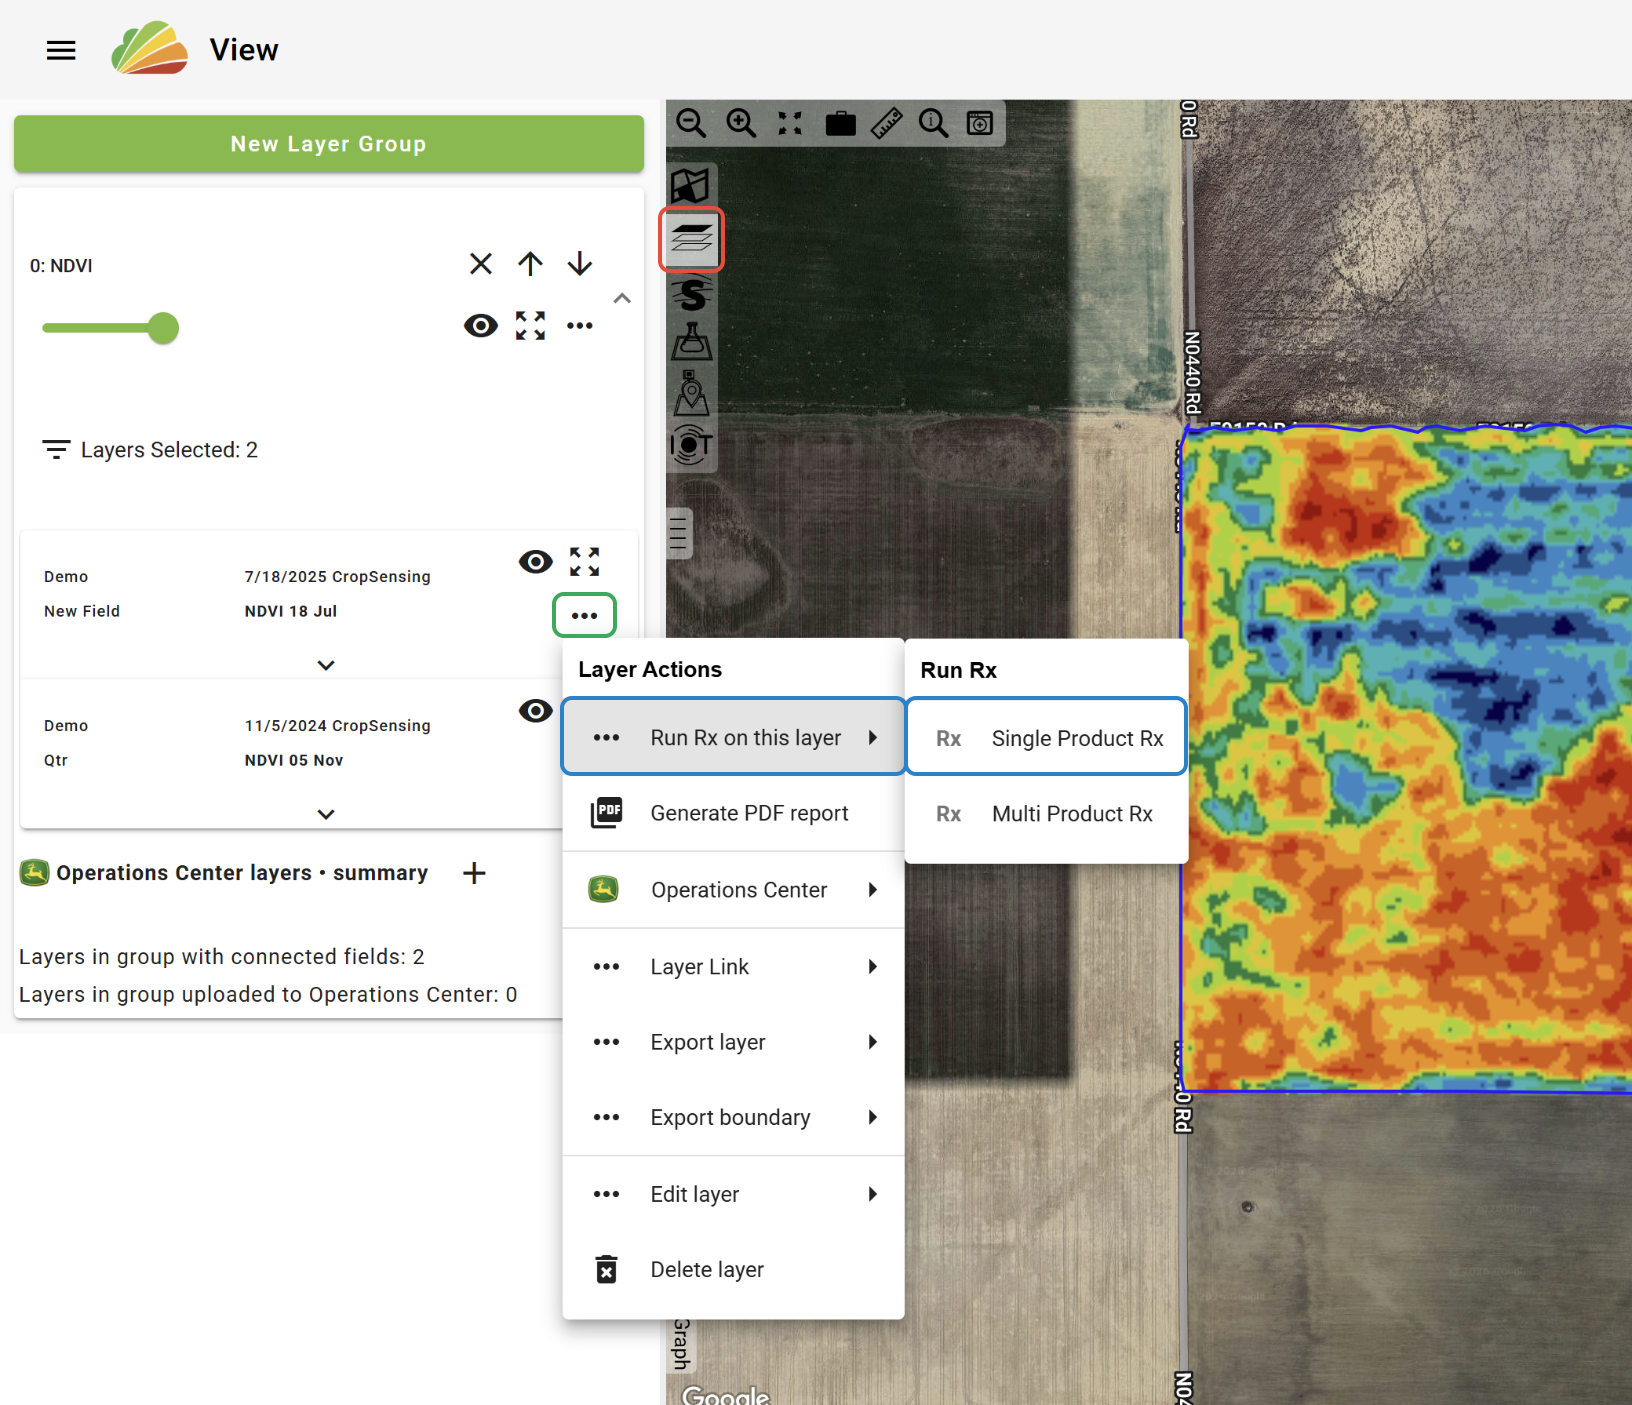
Layer Menu (View)
-This option only works for one field/layer at a time.
-In the View tool, select the 'Layers' tab.
-Load the desired layer, and select the 'Options' menu.
-Select 'Run Rx on this layer' and 'Single Product Rx'.
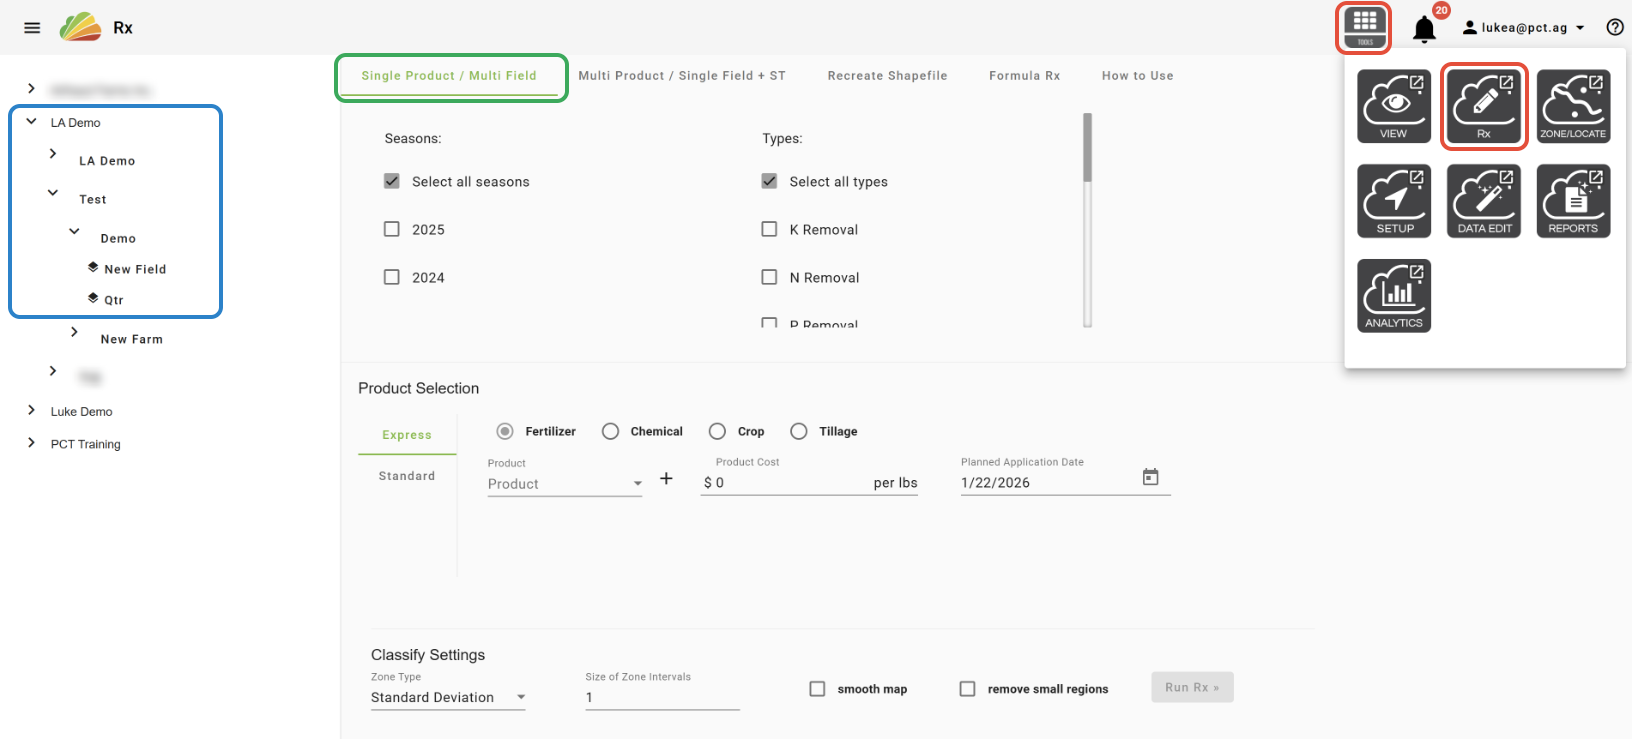
Rx Tool
-Only allows for the selection of one Grower, Farm, or Field at a time.
-Open the 'Rx' tool from the 'Tools' menu.
-Select the 'Single Product/Multi Field' tab.
-Select the Grower, Farm, or Field that you would like to create Rx's for.
Select layers
-Use the Season and Type filters to refine the list of layers at the bottom of the tool.
-Select the layers that you would like to create Rx's on.

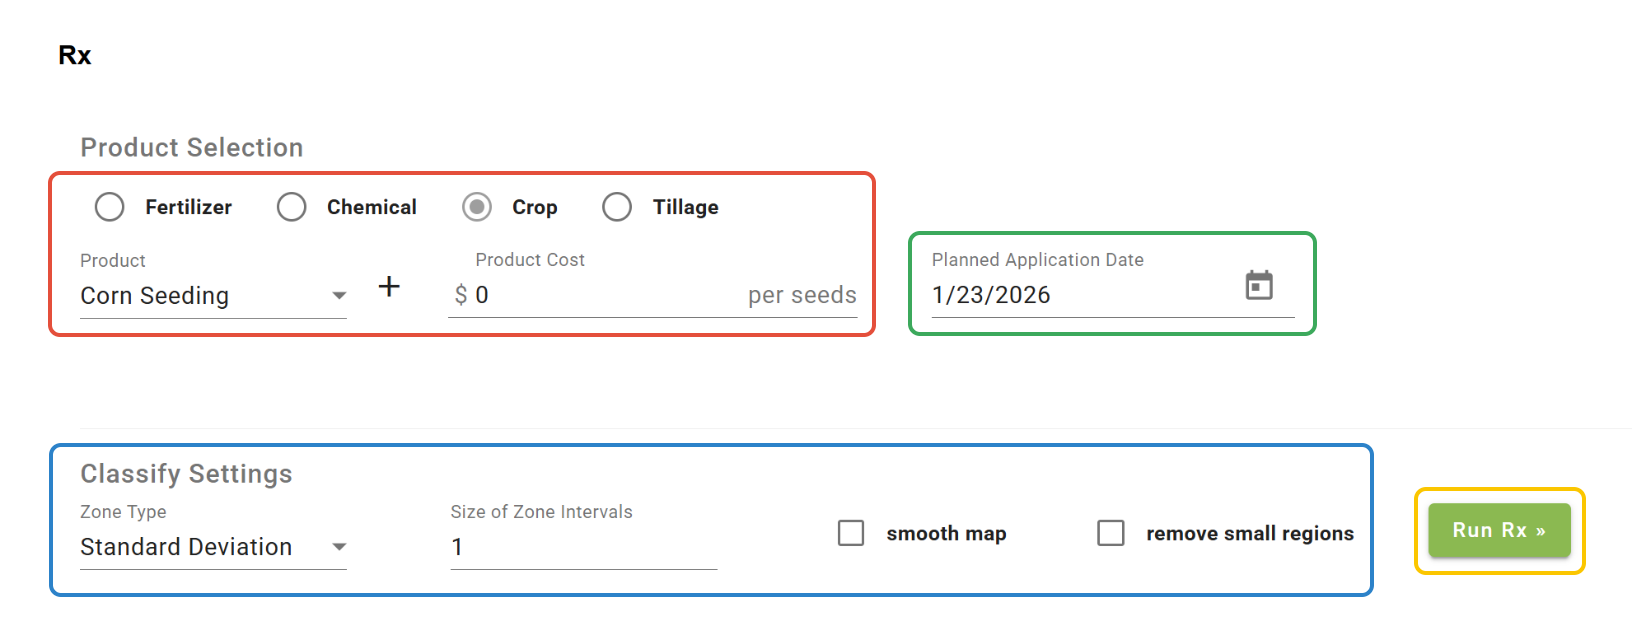
Choose Product
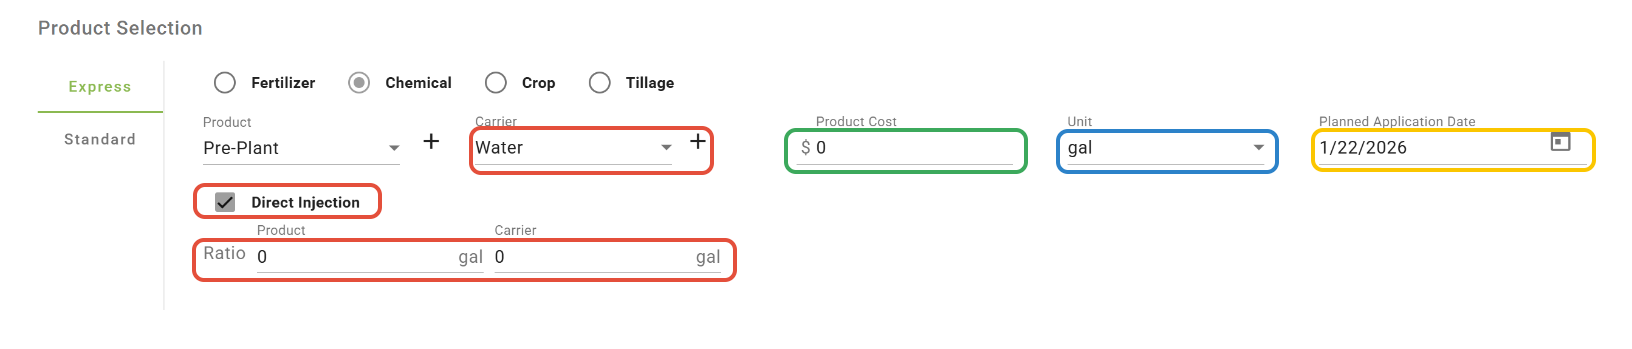
Express
-The 'Express' option for Product Selection provides some additional functionality over the 'Standard' option.
-Select the Product Type.
-Select a Product from the list, or click the '+' button to add a custom Product Name.
-Choose the Unit Type and click 'Add'.
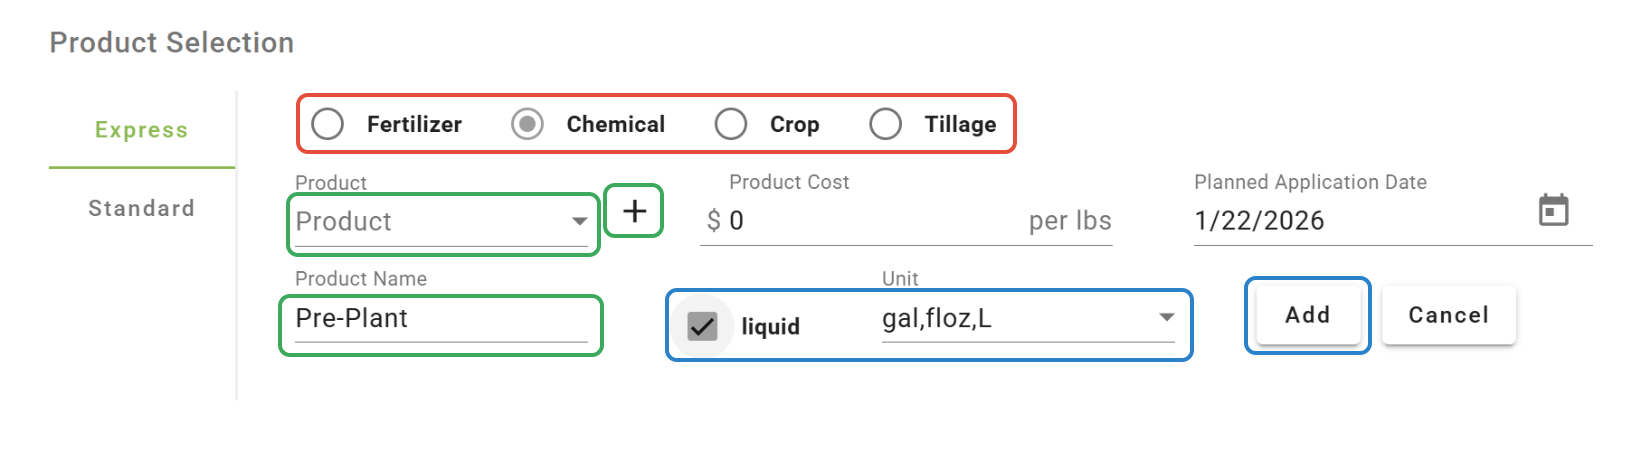
-For Liquid Products, a Carrier can be selected (optional) and the Product and Carrier rates can be entered independently. If needed, Direct Injection volumes can be specified.
-Assign a product cost (optional).
-Select a Unit.
-Set a Planned Application Date; this is the date that the layer(s) will be saved under.
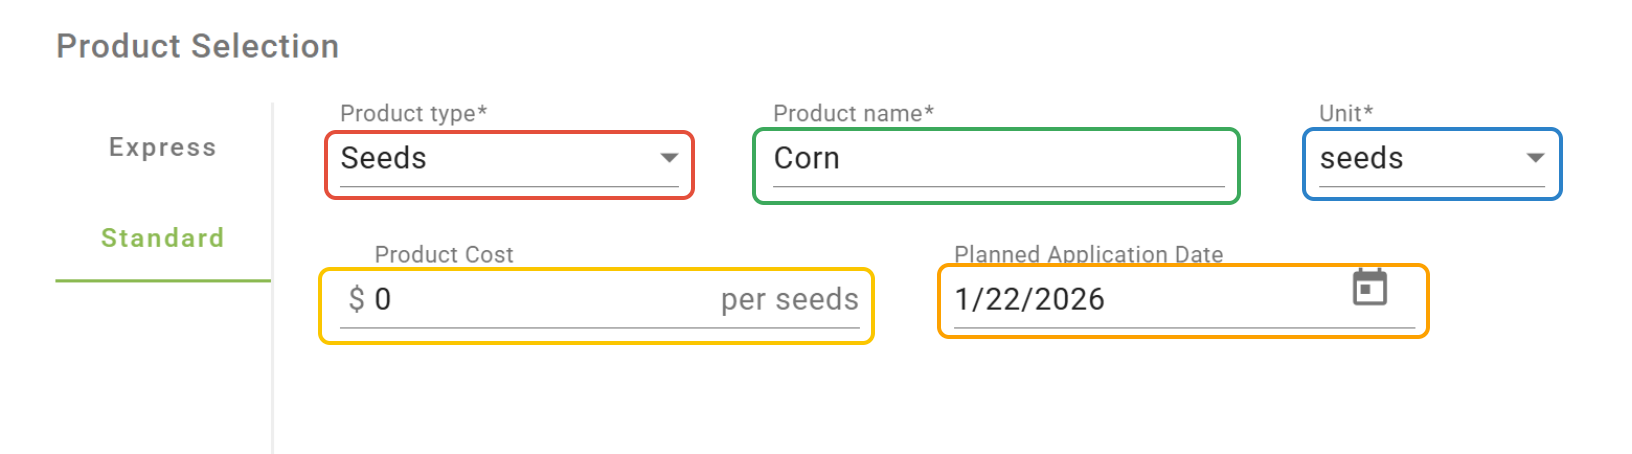
Standard
-The 'Standard' option provides a more simplified method of selecting products.
-Select a Product Type.
-Enter a Product Name.
-Select a Unit.
-Enter a Product Cost (optional).
-Set a Planned Application Date; this is the date that the layer(s) will be saved under.
Layer for Intersection
-Farming Type and Strip Trial layers can be selected as an intersecting layer to be included in the Rx.
-This option only operates for a single field at a time.

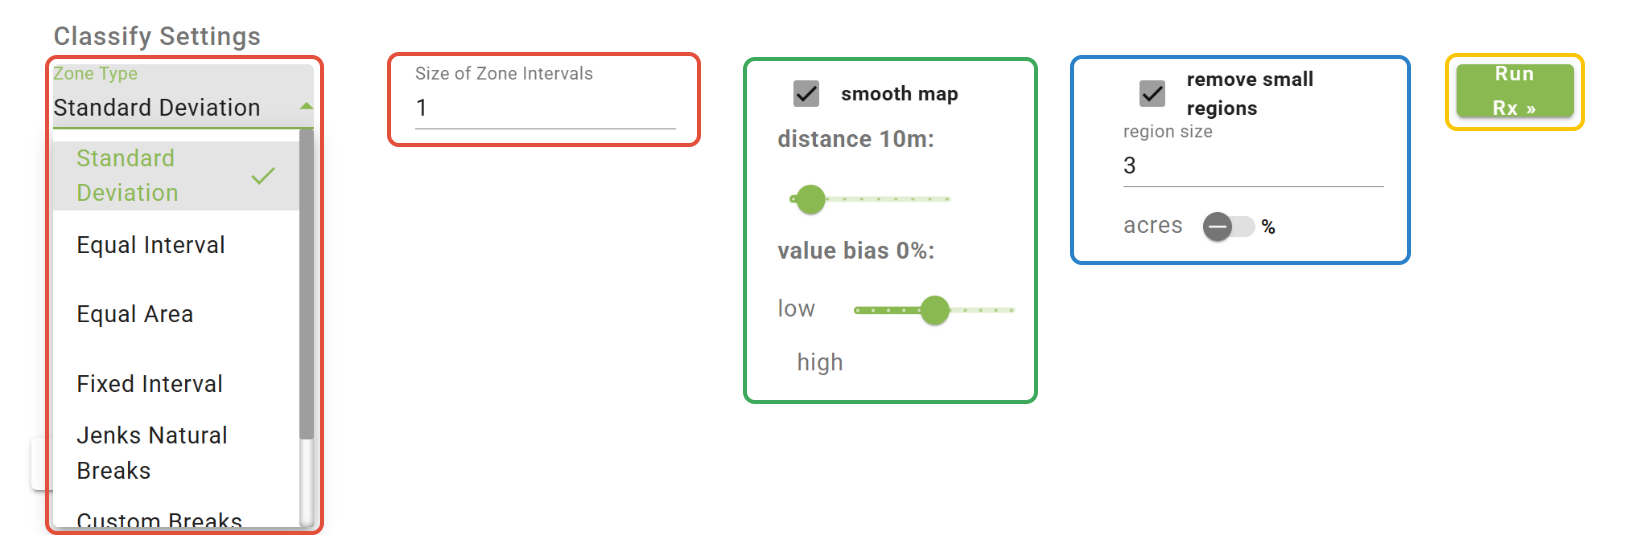
Classify Settings
-The Classify Settings are zoning parameters that will be applied to unzoned layers. When working with zoned layers, the Classify Settings can be ignored.
-Select the Zone Type and the Number or Size of Zone Intervals.
Note: Click HERE to learn more about Zone Types.
-The 'smooth map' option will smooth out the zone polygons. Use the 'distance' and 'value bias' to adjust the amount and extent of the smoothing.
-The 'remove small regions' option allows you to set a minimum polygon size. This can be done by the acre or by field percentage.
-When the parameters have been set, click 'Run Rx'.
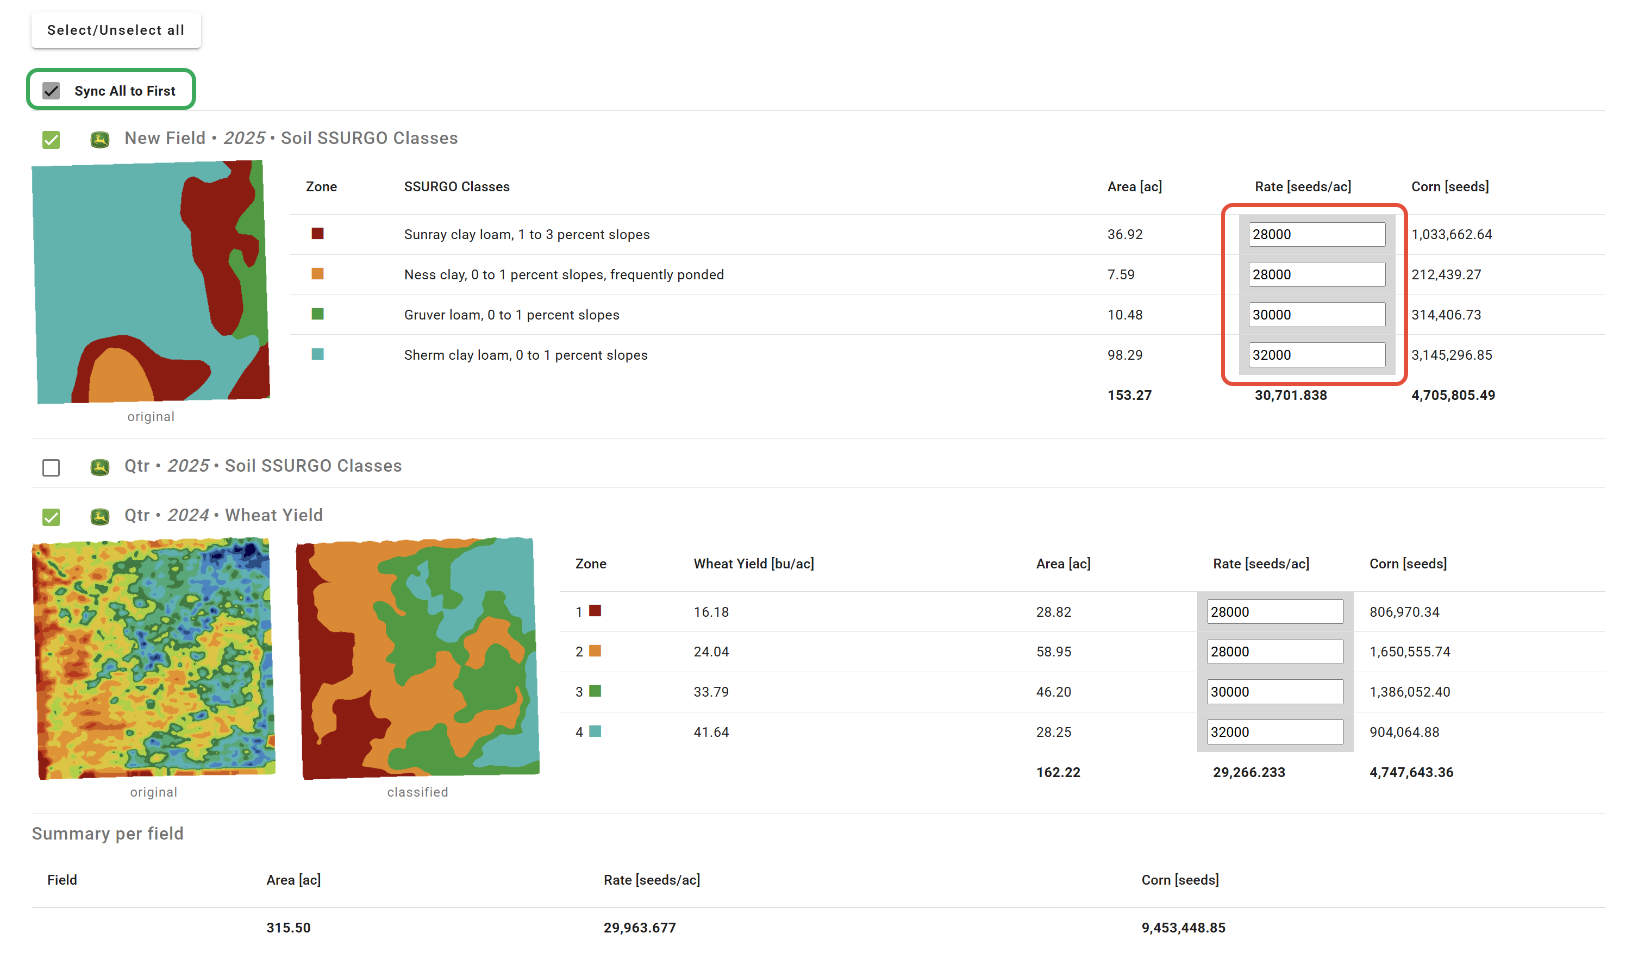
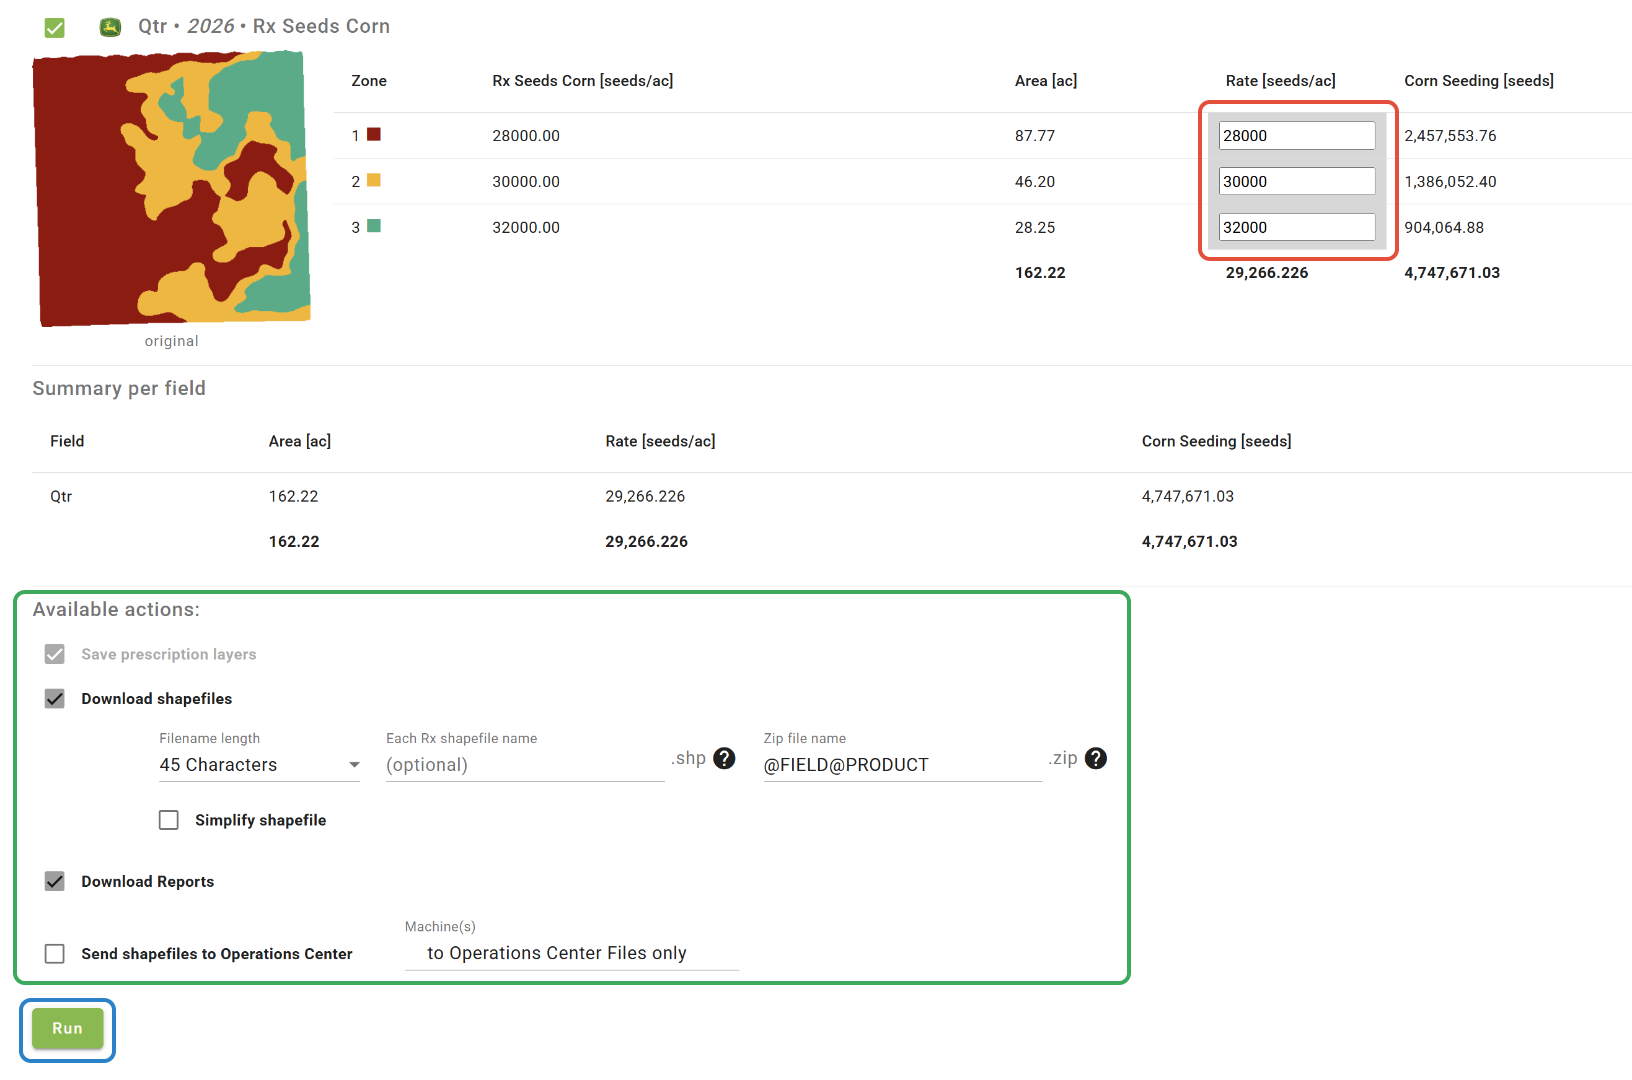
Assign Rates
-Enter values under the 'Rate' column.
-Check the 'Sync All to First' box to have the rates of all maps synced to those of the first. If the box is checked or unchecked, the rates of the lower maps can still be edited independently if needed.
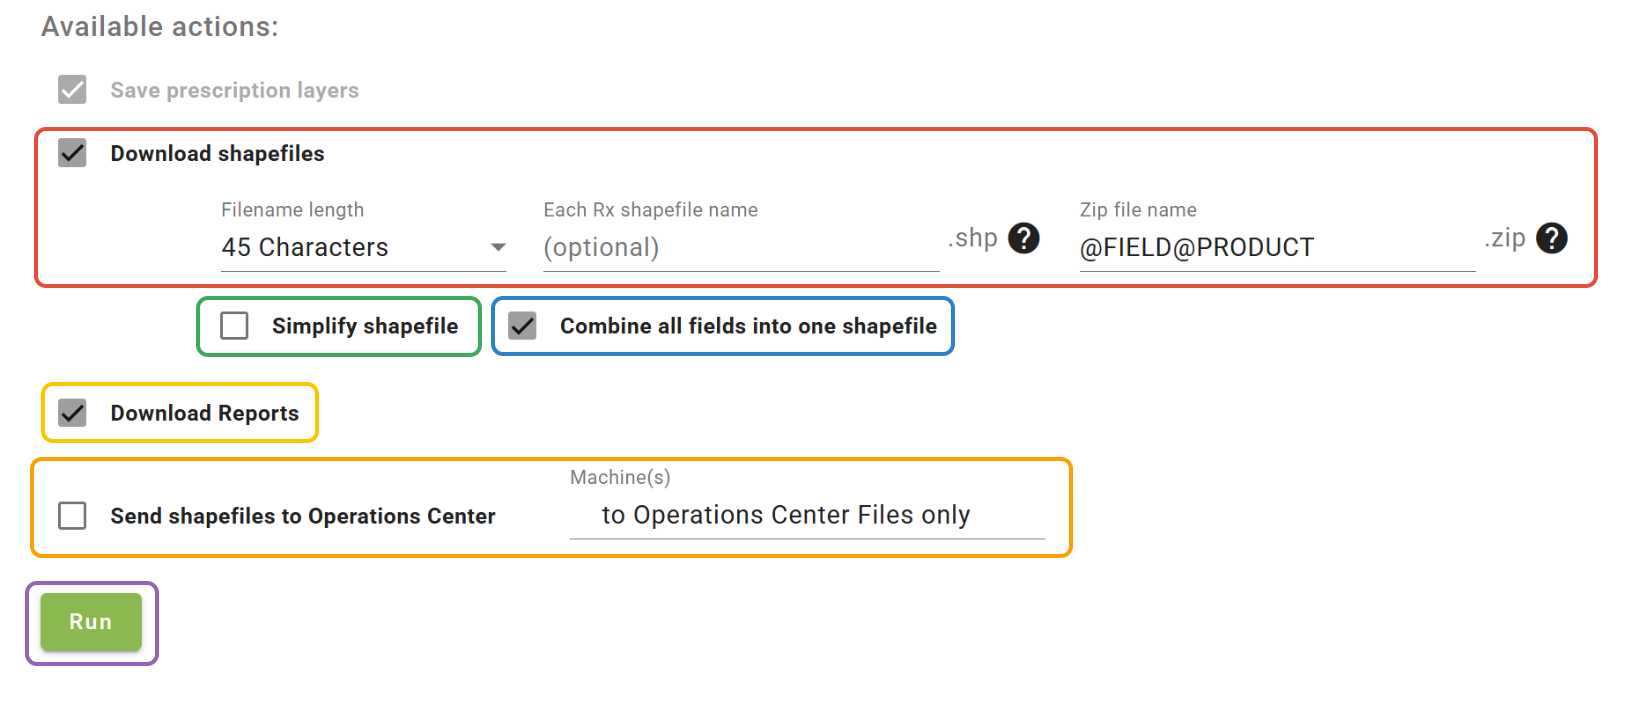
Save and Export
-If you choose to download the Rx shapefiles, you can choose the Filename length (character limit), as well as choose a custom name for either the individual files or the Zip file. The default naming format for the files contained within the ZIP file is GrowerFarmFieldProduct. If needed, the filename will be abbreviated in that order. A custom name can be entered for either the individual files or the ZIP file that will be applied to all, or a template of sorts can be made by using the @ sign to specify which naming components should be included in the filename. This template will be saved for the next time the tool is opened.
- 'Simplify shapefile' will reduce the number of points per polygon and the file size. This can be particularly useful for older monitors.
- When multiple Rx's have been created, you can choose to combine all the fields into a single shapefile; this will combine the reports as well.
- Check the 'Download Reports' box to download .pdf reports for the selected Rx layers.
- Check the 'Send shapefiles to Operations Center™' box to send the Rx's to the files page within Operations Center™. Select machines from the dropdown to send the Rx's directly to machines.
- When finished, click 'Run'.
Edit
-To edit an Rx layer created in the Single Product Rx tool, load the layer in the 'Layers' tab of the View tool.
-Open the 'Options' menu.
-Select 'Run Rx on this layer' and click 'Single Product Rx'. 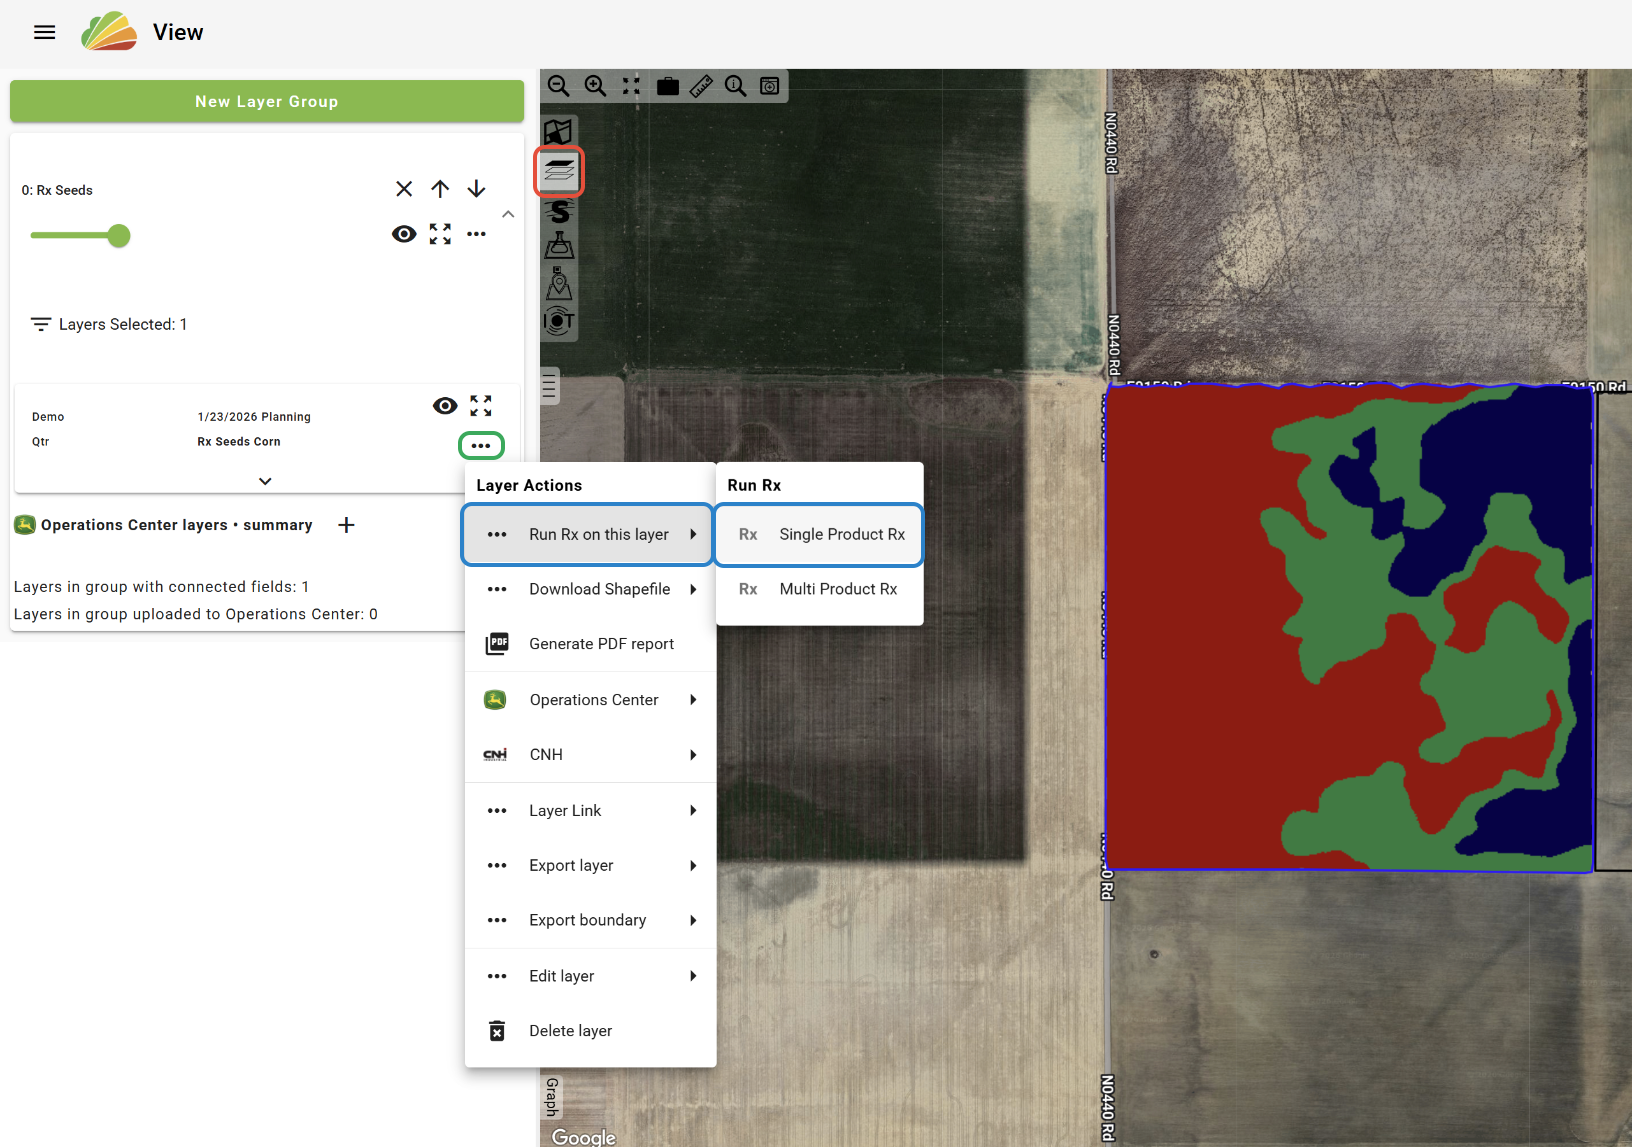
-Select a Product.
-To overwrite the original layer, choose the same Product and Planned Application Date. To save the edited Rx as a new layer, change the Product or the Planned Application Date.
-The Classify Settings can be ignored.
-Click 'Run Rx'.
-The rates of the original Rx will be automatically entered in the 'Rate' column. Edit the rates as needed.
-Configure the export settings as needed.
-Click 'Run'.
Was this article helpful?
That’s Great!
Thank you for your feedback
Sorry! We couldn't be helpful
Thank you for your feedback
Feedback sent
We appreciate your effort and will try to fix the article