The Zone Locate tool operates by zoning selected layer(s) and combining them to create one zoned map. Follow the steps below for instructions on how to use the tool.
The Zone Locate tool available in Zone/Locate operates the same application as the 'Create Zones' button in View.
Steps:
1. Select the desired layer(s) and click 'Create Zones' at the bottom of the page.
2. The original layer(s) are available at the top of the page. You can alter the amount of smoothing in the layer below the layers. 
Below the original layers are the zoned layers.
3. The zoning type and amount of zones can be edited using the 'Zone' button.
4. Painting tools that allow you to edit the zones as well as options to change zone values and add names are availble in the 'Edit' button.
5. You can change the order of the individual zoned maps using the 'Swap >' button. 
Below the individual zoned layers is the combined zones map.
6. You can change the Zoning Type using the 'Zoning Type' dropdown.
7. You can save the layer as a Management Zones Layer by clicking the 'Save management zones layer' button or as a Smart Zones or Intelli Zones layer if available.
8. Change the amount to which small zones are consolidated at the bottom of the window. 
Yield Comparison
Within the create zones tool, you also have the ability to compare the created zoned layers against yield and/or imagery.
To do so simply select the desired layer(s) and the comparison graph(s) will display below.
To create a similar report available for download, use the Compare tool in View: https://pctagcloud-support.freshdesk.com/support/solutions/articles/51000381761-compare-layers-in-view.


Generate Sample Points
Once the zone design is complete and saved, soil test sites can be added.
Previous points will appear in the button showing the event date (these can't be edited but can be used to save a new set of points if edited).
As with other zoning tools in PCT Agcloud, you have the option to manually place or automatically generate sample points within the k-Means Clustering tool.
To place individual points on the map, simply click on the zoned map.
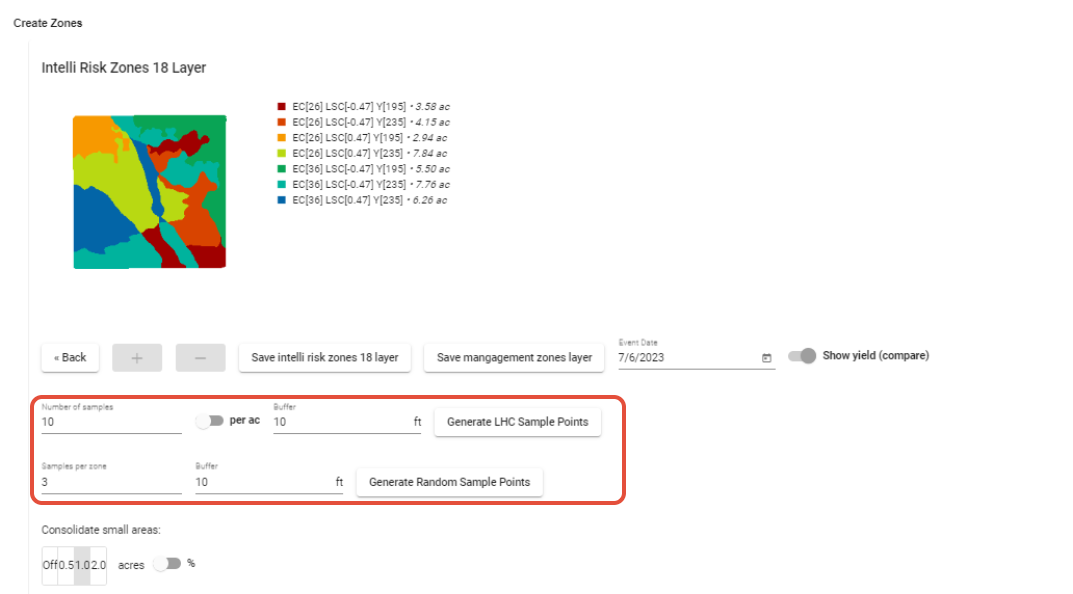
Soil sampling plans can also be generated using either stratified random sampling with the 'Generate Random Sample Points' button or conditioned Latin hypercube sampling with the 'Generate LHC Sample Points' button. For both options, you may select a buffer width to prevent sampling on the edges of fields or boundaries between zones.
The 'Generate Random Sample Points' option only utilizes the developed management zone layer and allocates the given number of samples randomly within each zone.
The 'Generate LHC Sample Points' option considers data in the input layers to optimize where the sampling sites are located. The samples are positioned so that they capture the maximum amount of variability in the input layers from the given number of sampling locations. This minimizes the correlation between sampling points and increases the overall efficiency of the sampling plan. LHC will not necessarily put an equal number of samples in each zone.
Once the points have been plotted, click the 'Save points' button at the bottom of the page.

Was this article helpful?
That’s Great!
Thank you for your feedback
Sorry! We couldn't be helpful
Thank you for your feedback
Feedback sent
We appreciate your effort and will try to fix the article